Tuesday, March 12, 2019

Sprint Calls out AT&T for Misleading 5GE Indicator in Full-Page NYT Ad

Sprint Calls out AT&T for Misleading 5GE Indicator in Full-Page NYT Ad


Sprint has taken out a full-page open letter ad in the Sunday’s edition of The New York Times calling out AT&T for its misleading “5GE” network indicator. With the iOS 12.2 beta update, iPhones on AT&T network have started showing the ‘5GE’ indicatorinstead of LTE. Some Galaxy phones will also receive a software update to make this change.

Despite the ‘5GE’ indicator, your iPhone will not have magically gained 5G capabilities with a software update. Instead, as per AT&T, the ‘5GE’ logo represents that you are in AT&T’s 5G Evolution market where it is able to offer higher and more stable LTE speeds. Yep, there’s no 5G here. AT&T is simply getting on the 5G bandwagon and purely misleading customers with this move.

Right now, this change is a part of iOS 12.2 beta but once the release goes public, more users will get confused seeing the 5GE logo in the status bar of their iPhone. No wonder then that Sprint has sued AT&T for this misleading marketing tactics. In its full-page NYT ad, Sprint says that while it is working hard on bringing 5G to its customers, AT&T is working hard on misleading its customers.

While Sprint is working hard to deliver mobile 5G and the first 5G smartphone in the U.S., AT&T is hard at work trying to convince you that they already won the race to 5G with something they call “5G Evolution.” That is simply untrue.

Don’t be fooled. 5G Evolution isn’t new or true 5G. It is fake 5G.

They would love for you to believe they are different … better. The truth is AT&T is simply offering customers a nationwide 4G LTE network just like Sprint and all the other major wireless carriers. It’s not 5G.

We filed a lawsuit against AT&T demanding that they immediately end their false and deceptive marketing campaign. AT&T seems to be delighted by the depth and breadth of their deception. AT&T admitted that the company’s 5G E advertising is strictly a narrative to outline how they want the world to work – not a reflection of today’s reality.

AT&T is working on bringing 5G to at least 12 U.S. cities this year but there are no smartphones in the market right now that can connect to it. So instead of highlighting that, AT&T decided to use deceptive marketing to fool its customers into thinking that they are already on its 5G network.

Sprint has already sued AT&T over this misleading campaign.
Our Take

While I can understand Android OEMs bending to the requirements of AT&T and allowing it to display a fake ‘5G’ indicator on their devices, I am shocked at how Apple could allow the carrier to do the same on iPhones. Apple has never allowed this before so it is definitely a strange move. It is possible that with the final release of iOS 12.2, this scenario changes and Apple removes the ‘5GE’ logo with something that is not so blatantly misleading.

Do you think AT&T is doing the right thing here by showing its Gigabit LTE network as ‘5GE’?

[Via Sprint]

Also Read:jihosoft Free iPhone Data Recovery

Sponsor ads:

Gihosoft Free iPhone Data Recovery:https://www.gihosoft.com/iphone-data-recovery-free.html

Gihosoft iPhone Data Recovery Free

Free iPhone Data Recovery Software for Windows/Mac

Recover up to 12+ types of files, including contacts, SMS, photos, WhatsApp, Viber, notes, etc.

Restore lost data from iOS devices directly or from iTunes and iCloud backup

Recover iPhone data lost due to iOS upgrade/jailbreak, accidental deletion, device lost or broken

Support all the latest iPhone, iPad and iPod Touch

Both Free and Pro version.

If you lost data after you updated to a new iPhone, you can always use Gihosoft iPhone Data Recovery to get the data back from the old iPhone or backup.You may also like: iphonerecovery.com

If you use android phones, please choose Gihosoft Android Data Recovery.

With Gihosoft Android Data Recovery, no longer afraid of data loss!

Must read:Youtube video downloader for pc

Gihosoft RePicvid Free Photo Recovery Software provides a free photo recovery software for windows to help users recover the deleted or lost photo for free.

Jihosoft Android Data Recovery: the best Android Data Recovery software for Windows and Mac to recover deleted contacts, messages, photos, videos, WhatsApp and etc from Android devices.Tips:How to transfer messages from iPhone to iPhone


Jihosoft File Recovery:Recover deleted, Lost, formatted, or corrupted files from PC, flash drive and memory card easily & safely

How To See Who Viewed your WhatsApp Story

How To See Who Viewed your WhatsApp Story

We know that Instagram and Snapchat did Stories but did you know WhatsApp does them too? They are called Status and I didn’t know about them until a couple of months ago when someone showed me while writing an entirely different WhatsApp tutorial. I promised to go back to the subject when I got the time and that’s today. This tutorial will show you how to see who viewed your WhatsApp story, how to use stories and how to hide them from prying eyes.


The idea behind the WhatsApp story, or Status, is similar to Snapchat. You can share a pic and a status with friends that stays live for 24 hours and then disappears. It received little of the fanfare that Snapchat Stories did which is why not so many people know about the feature.


Related: How to Recover Deleted WhatsApp Messages on Android from/without Backup


The Status tab had been staring me in the face for the longest time in the app but I never took any notice of it. It seems I’m not the only one if my friends are anything to go by with over half of them saying they either hadn’t heard of it or didn’t use it. We seem to be in a minority though because lots of people do use it.

WhatsApp stories are actually called Status and both terms are used interchangeably, I’ll use both here.


HOW TO CREATE A WHATSAPP STATUS POST

It’s probably easiest to think of WhatsApp Status the same as a Snapchat Story. A post showing where you are or what you’re doing at that time that lasts for 24 hours. It is just as easy to use as Snapchat’s too.

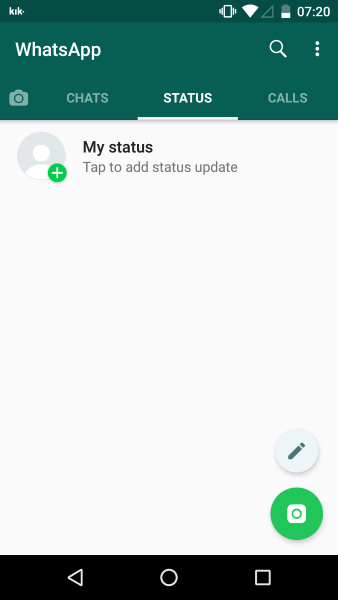
Open WhatsApp on your device.


Select the Status icon in the bottom left of the main screen.


Select My Status and then select the camera.


Take your image or video as required.


Add effects, text or whatever.


Select Send.

You can use all of the usual stickers, emojis, text and effects available within the app on your Status that you can within the rest of the app. Once you Send, the Status remains live for 24 hours before disappearing forever.

Related: How to Schedule WhatsApp Messages on Android and iPhone


SEE WHO VIEWED YOUR WHATSAPP STORY

You can see who has viewed your WhatsApp story. It’s a quick way to see who has engaged with it and who hasn’t.Also Read:8 Best To-do List Apps for Your iOS Device to Make Your Work Done
Also Read:Windows 10 Blue Light Filter: Learn Something about Your Eyes Saver

Also Read:Top 5 Best Free File Recovery Software 2019 for Windows and Mac

18 Best Indian Web Series on YouTube You Can’t Miss 2019


Open your story within WhatsApp.


Swipe up on the eye icon at the bottom of the screen.


See who has viewed from within the swipe menu.

The eye icon at the bottom of the screen has a number beside it. This is the number of people who have viewed your WhatsApp story. When you swipe up you can see exactly who they are and when they viewed it.


CONTROL WHO CAN SEE YOUR WHATSAPP STATUS

The idea of the WhatsApp Status is to show friends what you’re up to and where you are at a given time. You may not want everyone seeing what you’re doing so there is the option to not allow certain people to see it.


Open Status within WhatsApp.


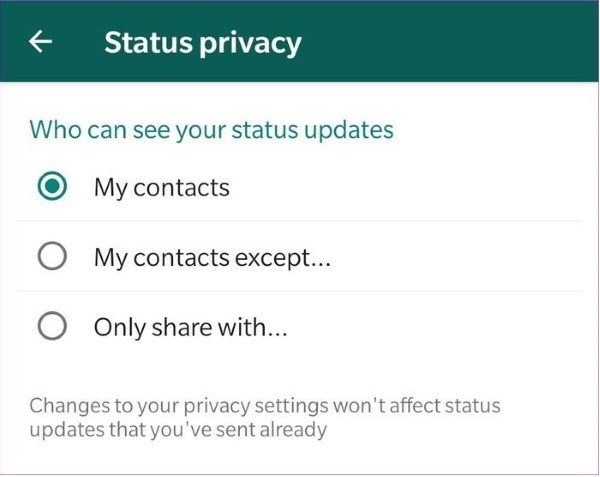
Select the three dot menu icon and Status Privacy.


Select who can see your WhatsApp Status.

You can select all your contacts or specify who sees it. The options are My contacts, My contacts except and Only share with… If there is someone you would prefer not to see your update, you can block them from here. They will not know they have been blocked from seeing it unless someone mentions it to them.


Related: How to Hide WhatsApp Chat Conversations in Android and iPhone


DELETE A WHATSAPP STATUS POST

Even though WhatsApp Status only stays up for 24 hours, there may be instances where you need to remove it faster than that. Fortunately, you can remove a post in seconds should you need to.


Go to the Status screen in WhatsApp.


Long press the three dot menu icon next to your status.


Select Trash from the popup menu that appears.

Your WhatsApp Status will be deleted right away. Anyone in the process of viewing it will be able to finish but once they close it, the update will disappear.

Related: 5 Best No Crop Apps for WhatsApp & Instagram to Post Full Size Pics
MAKE SURE SOMEONE SEES YOUR WHATSAPP STATUS

If putting it out there isn’t enough for you, you can manually forward your WhatsApp Status to your contacts to a chat if you like. This is a little pushy but if you’re really proud of it or really need someone’s input or opinion, it’s a useful feature.


Select the three dot menu icon next to the status.


Select the Forward icon.


Select from Frequently contacted, Recent chats, Other contacts or use Search to find the recipient.


Select Send once you have selected who to send it to.

Do you use WhatsApp Status? Got any tips for us and our fellow readers? Tell us about them below if you do!


More tutorials for WhatsApp users:

Top 8 Methods to Run Two WhatsApp Accounts on One Phone Easily

How to Change Your Phone Number On WhatsApp


Monday, March 4, 2019

How To Remove An In-App Purchase From An Android Phone?

How To Remove An In-App Purchase From An Android Phone?

Do you have an Android phone where you love using fancy apps to enhance your experience? Are you struggling with the in-App purchases and don’t want to keep paying extra for using some premium features? If your answer to these questions is yes, then you have come to the right place! We understand that it can be frustrating if you are not able to use all the premium features of an app or you are not able to go beyond the demo version.

Also Read: How to Hide Apps on Android without Rooting

To solve this problem, we will show you hacks for these apps so you can use all the features of an app without really paying for it. Let us check it out!


Method 1

You need to have Lucky patcher apk in order to do it.

Step 1: Download Lucky patcher from their official website.
Also Read:How to Recover Files and Data from Formatted Hard Disk DriveAlso Read:3 Ways to Restore Your iPhone without Updating in 2019

Step 2: Open Lucky patcher apk on the device where you want to unlock your app.

Step 3: You need to launch Lucky patcher and also grant it the root access.

Step 4: After that, you need to minimize the window of Lucky patcher apk or even close it at that point. Then, launch the app for which you require full access to premium features by availing the pro/paid version.

Step 5: Go to the section for purchase and click on the option that says “Buy” or “Upgrade” to the pro version. Basically, you need to click on the option that asks you to upgrade your app.

Step 6: When you click on this option, the Lucky patcher window will open instead of diverting you to Google in-app purchase window. Then, you will see a window that will ask you “Do you want to get this app for free?” At this point, you need to select “Yes.”

Step 7: Viola! This is done! You have successfully hacked the in-app purchases on your Android phone. Once this is done, you will notice that the features that you were trying to use will be unlocked immediately. Alternatively, if something needs to be downloaded in order to avail those features, the download will start automatically.

Also Read: How to Disable Notifications While Playing Games on Android

Alternatively, if you want to increase your chances of success, you can follow the steps given below as well:

Step 1: Open the Lucky patcher apk on your device and look for the Google play store.

Step 2: Then, simply tap on it and click on “Open patches menu.”

Step 3: A warning will be displayed “It is a system app …” Then, you need to choose “Ok.”

Step 4: Click on “custom patch” and then select the option that says “support.inapp.LVL.android.vending.” Once you select this, click on the option “Apply.”

Step 5: You need to reboot your device after that.

Step 6: After the reboot is done, you can try Method 1 another time.

When you apply this custom pack, your chances of being successful in unlocking all the features are higher.

After doing this, if you don’t want Lucky patcher to automatically open whenever you start your device, you can disable it. You can do so by following these two easy steps:

Step 1: Open Lucky patcher on your device and then go to the bottom left corner where you will find the toolbox

Step 2: Once you get there, select the option that says “Disable Google billing emulation’ to disable it permanently finally.
Method 2

If you want to try out another method to help you get the premium features on your Android app, follow these steps:

Step 1: Open Lucky patcher on your device. Once you open it, look for the app for which you want to unlock the premium features.

Step 2: If there are in-app purchases available for the given app, you will see the option that says “in-app purchases available” on the app.

Step 3: You need to press on the app for a long time to get the option to open the “menu of patches.”

Step 4: Select the option “support the patch for in-app purchase and LVL emulation.”

Step 5: Once you finish this process, you must click on “Apply” and then wait until it is done completely. Once this is done, you will see that the reboot process on your phone will start right away.

You can then check the app, and if you were successful in this process, you would see all the premium features of your app unlocked.

Also Read: How to Check a Used, Second-Hand, or Refurbished Mobile Phone

Final Words

The methods mentioned above can help you avail premium features in any of the apps of your choice. You never have to make any in-app purchases and spend extra money to unlock these special features. All you need to do is, download Lucky patch apk and follow any of the methods given here to enjoy some premium features of your favorite apps.

Tip: Lost data from your Android phone? Let this free Android data recovery tool help you get them back!

How to Fix Software for This iPhone is Not Currently Available


You may see this аlеrt mеssаgе: "А sоftwаrе uрdаtе іs required to connect to your iPhone (or iPad)" when you connect your device to your computer and attempt to restore it.
How to Fix Software for This iPhone is Not Currently Available

If you are experiencing this problem also, here is what you can do to troubleshoot:
Way 1. Restart Your iPhone

To switch off and restart уоur іРhоnе, уоu can follow the steps below:

Step 1. Press and hold the power button for a few seconds.

Step 2. Wait until you see Slide to Power Off appear on your screen.

Step 3. Swipe the Slide to Power Off slider.

Step 4. Press the power button again and wait for your device to turn on.


Way 2. Update Your iTunes

The easiest way to uрgrаdе іТunеs requires you to do almost nothing. That's because iTunes automatically notifies you when a new version is released. In that case, а рор-uр wіndоw аnnоunсіng thе uрgrаdе will арреаr when you launch iTunes. If you see that window and want to upgrade, just follow the onscreen instructions and you'll be running the iTunes in no time.

If that window doesn't appear, you can start an update manually by following the steps below.

If you are using a Mac computer, iTunes comes along with the latest Mac operating system. So you just need to update your Mac to get the latest iTunes version.

Go to the "Menu" -> "System Preferences" -> tap on the "Software Update".

If you are using a Windows computer, then make sure that you are using the most recent version of the iTunes software. If you downloaded iTunes from the iTunes web site (not from the Microsoft Store) then:

Open iTunes -> click Help -> click Check for Updates. If there is a newer version, then update it.


Way 3. Update Your Computer

Sometimes updating your computer can also solve the iPhone is not currently available issue.

For Windows users:

Go to the "Control Panel" -> choose "System and Security" -> click "Windows Update".


For Mac users:


for Mac OS earlier than OS Mojave:

Go to the App Store on your Mac system -> tap on the "Updates" from App Store toolbar -> choose to update from that list.


for Mac OS Mojave:

Open the Apple menu -> go to the "System Preferences" -> click on the "Software Update" (if there is an available one, then tap "Update Now").
Also Read:How to Change Message/iMessage Background on iPhone with/without Jailbreak
Sponsor ads:
Gihosoft iPhone Data Recovery Free
Free iPhone Data Recovery Software for Windows/Mac
Recover up to 12+ types of files, including contacts, SMS, photos, WhatsApp, Viber, notes, etc.
Restore lost data from iOS devices directly or from iTunes and iCloud backup
Recover iPhone data lost due to iOS upgrade/jailbreak, accidental deletion, device lost or broken
Support all the latest iPhone, iPad and iPod Touch
Both Free and Pro version.
If you lost data after you updated to a new iPhone, you can always use Gihosoft iPhone Data Recovery to get the data back from the old iPhone or backup.You may also like: iphonerecovery.com
If you use android phones, please choose Gihosoft Android Data Recovery.
With Gihosoft Android Data Recovery, no longer afraid of data loss!
Gihosoft RePicvid Free Photo Recovery Software provides a free photo recovery software for windows to help users recover the deleted or lost photo for free.
Jihosoft Android Data Recovery: the best Android Data Recovery software for Windows and Mac to recover deleted contacts, messages, photos, videos, WhatsApp and etc from Android devices.Tips:How to transfer messages from iPhone to iPhone


Also Read:What is iTunes Helper & How to Disable it from Windows/Mac PC

Sunday, March 3, 2019

Fix “iPhone Taking Forever to Backup” 2019

Solutions to Fix “iPhone Taking Forever to Backup”

If iPhone backup is taking hours to complete or forever, you can use any of these guides to fix the issue:


Uninstall Old iPhone Apps: Crowding up your iPhone with old games you’ve stopped playing for months can lead to slow iTunes backups and iPhone taking forever to backup. Old apps will make you have more data to back up every time you’re backing up your iPhone. Since there is no much reason to keep them on your iPhone, just erase them to speed up your iPhone.

Sponsor ads:Apps To Brighten & Enhance Videos Taken on iPhone

Also Read:Fix and Repair Old Photos?


Delete duplicate and large photos: Your iPhone backup may take forever to complete if you have large camera rolls and photos on your iPhone. The truth is that when you have many large photos with their duplicate in your iPhone storage space, iTunes may tend to spend more time backing up these large files to your PC. The best thing to do is to delete the large and duplicate photos from your iPhone.
Step 1: Launch Photo, and scroll through each photo on your iPhone to fetch out the duplicate and large photos.
Step 2: Delete them from your iPhone. However, make sure these photos are already backed up on your computer.


Regularly backup your iPhone: There is a correlation between the length of time a backup takes to complete and the interval between backups. When you allow too much time to pass before backing up your iPhone, you may tend to accumulate excess files before the next backup. The best way to avoid “iPhone backup taking forever” is by scheduling a specific interval for backing up your iPhone data.

iPhone taking forever to backup may be due to the following causes listed above, and the solutions above can help you to fix the problem. However, we highly recommend iMyFone TunesFix for fixing iTunes errors and issues like super-slow iTunes/iPhone backups. So, download and install iMyFone TunesFix on your PC to start enjoying fast iTunes performance during backups.Sponsor ads:7 Best Twitch Streaming Software (Free and Paid) for You 2019
Also Read:Fix iTunes Error 1671 When Updating iPhone/iPad

The Maximum Number of Free Accounts Have Been Activated on this iPhone, How to Fix?

The Maximum Number of Free Accounts Have Been Activated on this iPhone, How to Fix?

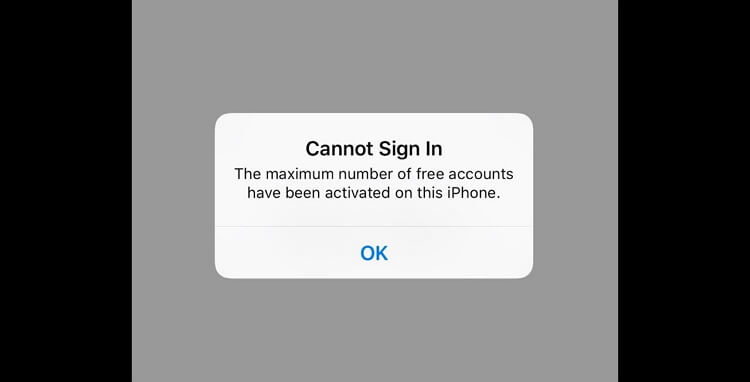
Have you tried to create an iCloud account on your iPhone and you see an error message saying, "The Maximum Number of Free Accounts Have Been activated on this iPhone?" This error message can pop up even when you are certain you didn't create many iCloud accounts.

If you see it, it is likely that you have exceeded the limit of the number of iCloud accounts you can have on one device. If you are sure you haven't, the following solutions should eliminate the problem.


Why You See This Error Message?


Create an iCloud Account on Browser and Then Log in on iPhone


Restore a Backup to the Device to Fix the Issue
1. Why You See This Error Message?

Before we begin with the solutions, it is important to understand why this issue happens. That way, you can at the very least prevent it from happening again. On your iPhone, there is a limit to the number of iCloud accounts you can create. You can sign in to an unlimited number of iCloud accounts, but you can only create 3. Therefore, if you are seeing this error message and you are certain you didn't create 3 iCloud accounts; it is likely that you bought a second hand device and the previous owner had exhausted this limit.


That said the following solutions can help you fix this issue that users cannot sign in the maximum number of free accounts have been activated on this iPhone.
2. Create iCloud Account on Browser, Then Log in on iPhone

When this error shows up, it means that you are unable to create the new account, let alone to log it in on your iPhone to perform the task you need to perform. If you are on a browser instead, it can be easier to create a new account without having to go to Settings on your device.

To create an iCloud account on your computer, follow these simple steps;


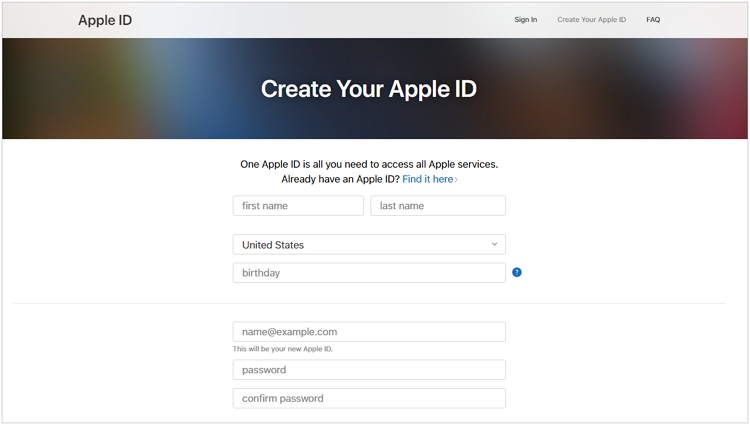
Step 1: Go to https://appleid.apple.com/account#!&page=create and follow the instructions to create an iCloud account.


Step 2: After creating the account, go to your iPhone, log in to the iCloud account you just created.


3. Restore a Backup to the Device to Fix the Issue

If you create an account on a computer but you are still unable to sign in to your iCloud account, you may need to restore a backup to the device. Depending on your backup method, you can choose to restore from an iCloud or iTunes Backup following Apple's instructions. These are great options but you can also choose to use iMyFone D-Port Pro to restore the backup. As a professional backup and restore tool, it offers more options than restoring backup from iCloud and iTunes.Sponsor ads:

Gihosoft Free iPhone Data Recovery:https://www.gihosoft.com/iphone-data-recovery-free.html

Gihosoft iPhone Data Recovery Free

Free iPhone Data Recovery Software for Windows/Mac

Recover up to 12+ types of files, including contacts, SMS, photos, WhatsApp, Viber, notes, etc.jihosoft Free iPhone Data Recovery

Restore lost data from iOS devices directly or from iTunes and iCloud backup

Recover iPhone data lost due to iOS upgrade/jailbreak, accidental deletion, device lost or broken

Support all the latest iPhone, iPad and iPod Touch

Both Free and Pro version.

If you lost data after you updated to a new iPhone, you can always use Gihosoft iPhone Data Recovery to get the data back from the old iPhone or backup.You may also like: iphonerecovery.com

If you use android phones, please choose Gihosoft Android Data Recovery.

With Gihosoft Android Data Recovery, no longer afraid of data loss!

Must read:Youtube video downloader for pc

Gihosoft RePicvid Free Photo Recovery Software provides a free photo recovery software for windows to help users recover the deleted or lost photo for free.

Jihosoft Android Data Recovery: the best Android Data Recovery software for Windows and Mac to recover deleted contacts, messages, photos, videos, WhatsApp and etc from Android devices.Tips:How to transfer messages from iPhone to iPhone


Clearing iCloud – How to Clear iCloud Space on Your iPhone


Clearing iCloud – How to Clear iCloud Space on Your iPhone
iClould is a great way to backup information on your iPhone, and Apple offers it free to everyone. But you might be surprised how quickly your iCloud space can fill up. Keep iCloud backups of all your photos, videos, and text messages, and before you know it you will have no room left. And remember, your storage space is offered per Apple ID, not per device. This means that if you have more than one device saving to iCloud, your storage space will fill up even quicker. So today, we’re going to discuss on how to clear iCloud and free up some much needed space.


Part 1: How to View How Much iCloud Storage Space You Have


Part 2: How to Clear iCloud on iPhone to Free up Space


Part 3: How to Save iPhone Space –Free Clean Up


Part 4: Will iCloud Storage Lead to Privacy Leak?
Part 1.How to View How Much iCloud Storage Space You Have

Before we go erasing a bunch of data, we should first check to see how much space you have left in iCloud - you might not even need to clear iCloud space yet. Here’s how to do it:

Step 1: On your iPhone, go to your Settings option.

Step 2: Click on iCloud

Step 3: Click on Storage


Under the “Storage” heading you will see how much of your space you have used. If you want to learn how this space has been distributed, click on “Manage Storage”.
Part 2. How to Clear iCloud on iPhone to Free up Space

Okay, so your space is almost full and you have decided that you better clean up iCloud a little. Here’s what to do next:
A) Turn off Backup Apps That You Are Not Using

Before actually clearing any of your data, let’s start by turning iCloud off for any apps that you are not using. These apps can often take up unwanted and unneeded storage space, leaving less room for the things that you actually want to keep. Here’s how:

Step 1: On your iPhone, go to your Settings option.

Step 2: Click on “iCloud”

Step 3:Swipe the one’s you don’t want to save into off mode.


B) Delete Old iCloud Backups

When it comes to iCloud, your old backups are probably taking up most of your space. These backups can extend way back in time, to when you owned your first iPhone! Chances are, you don’t need most of these backups, so go ahead and clear iCloud space. Here’s how:

Step 1: On your iPhone, go to your Settings option.

Step 2: Click on “iCloud”.

Step 3: Click on “Manage Storage”

Step 4: Select the device you would like to erase data from.

Step 5: Scroll to the bottom of the new window and click “delete backup”


C) Reduce the Size of Your iCloud Photo Library

In today’s day and age, we are all master photographers, and our phones are our new photo albums. Most of us store photos on our devices that are years old, and many that we have already developed or simply don’t need anymore. And photos are a huge culprit for taking up space on our iCloud. Here’s how to clean up iCloud:

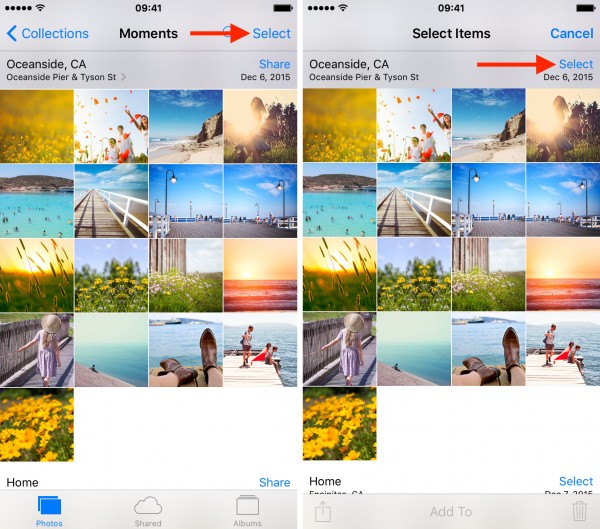
Step 1: Head over to Photos app

Step 2: Tap Photos at the left bottom of your screen

Step 3:Tap Select on the right upper corner, choose one or more photos to delete

Step 4:Then click the icon of Dustbin, and confirm deletion by tapping Delete Photo


D) Delete Files in iCloud Drive

Okay, so now we’ve deleted all of our backups, and we’ve cleared out some unneeded photos. Now it’s time to clean out the rest of our iCloud drive. Here’s how:

Step 1: Launch iCloud Drive from the iOS home screen

Step 2: Click Select and choose files to delete

Step 3: Click Delete and confirm to remove selected files


When you do this, all of the data and files associated with the selected apps will be removed from iCloud, freeing up a great deal of iCloud space.Sponsor ads:

Gihosoft Free iPhone Data Recovery:https://www.gihosoft.com/iphone-data-recovery-free.html

Gihosoft iPhone Data Recovery Free

Free iPhone Data Recovery Software for Windows/Mac

Recover up to 12+ types of files, including contacts, SMS, photos, WhatsApp, Viber, notes, etc.

Restore lost data from iOS devices directly or from iTunes and iCloud backup

Recover iPhone data lost due to iOS upgrade/jailbreak, accidental deletion, device lost or broken

Support all the latest iPhone, iPad and iPod Touch

Both Free and Pro version.

If you lost data after you updated to a new iPhone, you can always use Gihosoft iPhone Data Recovery to get the data back from the old iPhone or backup.You may also like: iphonerecovery.com

If you use android phones, please choose Gihosoft Android Data Recovery.

With Gihosoft Android Data Recovery, no longer afraid of data loss!

Must read:Youtube video downloader for pc

Gihosoft RePicvid Free Photo Recovery Software provides a free photo recovery software for windows to help users recover the deleted or lost photo for free.

Jihosoft Android Data Recovery: the best Android Data Recovery software for Windows and Mac to recover deleted contacts, messages, photos, videos, WhatsApp and etc from Android devices.Tips:How to transfer messages from iPhone to iPhone

jihosoft Free iPhone Data Recovery